 I develop using both PHP and Java on OS X. I use Eclipse as my main development environment for Java and have been using Coda for a long time for PHP development.
Coda is a very useful tool by Panic, the creators of Transmit, one of the best FTP and SSH file transmission tools for Mac OS X. It is a PHP, HTML and CSS file editor. Coda optimises your web development workflow by seamlessly integrating with Subversion and by allowing you to upload the files you have just changed to your server's FTP by just hitting a key combination. Coda costs $99 for a single user license.
While Coda's CSS code completion is pretty good, I find myself working mostly with backend PHP files and XSLT templates for presentation. Apparently Coda can do PHP autocompletion, but at least for me it fails at a very basic level; for instance I cannot get it to autocomplete class attributes even when editing the class file itself. Sometimes it just gets frustrating.
I wanted to find a better alternative to Coda with the following features:
- PHP code autocompletion.
- SVN integration.
- Ability to quickly upload changed files to my server's FTP.
1. Download Eclipse for PHP developers. This is the main Eclipse IDE including PDT (PHP Development Tools) and WTP (Web Tools Platform). This has almost everything you will need (PHP syntax coloring, code completion and so on).
2. Install the Subversive SVN plugin. You will need this in order to manage your projects with subversion. To install the plugin you will need to start Eclipse, go to Help -> Install new software, add the Subversive update site and install the Subversive packages. Detailed instructions on installing the plugin can be found at the subversive website.
3. Install the ant plugin. You will need ant to be able to upload your files via FTP. I found ant to be the best and most effective alternative to accomplish this task. I tried Aptana file upload and Eclipse Remote Systems Explorer. These both options allow you to upload files from the eclipse GUI, but they do not synchronize your files. That means you'll either keep track of what changed and upload the files one by one, or upload your entire site every time. While the Aptana documentation states it has the ability to sync files, it appears to have been removed from the latest release. To install the ant plugin you have to start Eclipse and go to Help -> Install new software, select the Galileo site, and then browse for Programming languages -> Eclipse java development tools.
4. Download the apache commons-net libraries. You will need these to be able to use FTP from ant. Place the JAR files somewhere in your hard drive.
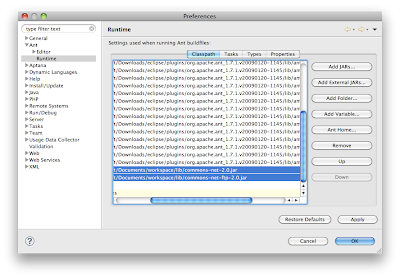
5. Configure eclipse/ant to use apache-commons. To do this you have to start Eclipse and go to the Preferences window. Then find the Ant -> Runtime category, click on the classpath tab and then click on external JARs. Select the files commons-net-2.0.jar and commons-net-ftp-2.0.jar (which you downloaded in step 4) and click ok.

6. Checkout your project from SVN. Go to File -> New -> SVN -> Project from SVN. Please check the subversion website if you need further information on checking out a project (I assume you already know how to do that if you are reading this).
7. Add a build.xml file to your project. This is going to be an ant buildfile which we are going to use to upload our files. You can use the following code as an example:
<?xml version="1.0" encoding="UTF-8"?>
<project name="MyProject">
<target name="Upload changed files">
<ftp
server="ftp.myserver.com"
userid="benlinus"
password="4815162342"
remotedir="www"
depends="yes"
verbose="yes"
>
<fileset dir="www" />
</ftp>
</target>
</project>
<project name="MyProject">
<target name="Upload changed files">
<ftp
server="ftp.myserver.com"
userid="benlinus"
password="4815162342"
remotedir="www"
depends="yes"
verbose="yes"
>
<fileset dir="www" />
</ftp>
</target>
</project>
Please change the server, userid and password to suit your needs. Also you might have to adapt the remotedir and local directory settings. The key here is the depends="yes" attribute, which tells the ant task to upload only the local files that are different from the files on the server.
8. Add your buildfile to the ant view. If the ant view is not open, go to Window -> show view -> other and select the ant view. You can add your build.xml file by dragging and dropping it onto the view or by clicking on the add buildfiles icon.
That's pretty much it. Now you can edit your code using Eclipse using advanced code autocompletion, manage your project using Subversion and upload your files by double-clicking on the "Upload changed files" target we just created.
Bonus: You can hit the command+option+x, q key combination in order to run your ant task.
All comments will be appreciated! And if you have a better alternative please share it :)


No comments:
New comments are not allowed.